Editor’s intro
When writing for a dental publication writing in an organized and understandable way will help make editors happy and also will bring your ideas clearly to your reader. Read Jackie Raulerson’s article for tips on delivering your message successfully.
Dental marketer, Jackie Raulerson, offers insights into crafting engaging articles for dental publications
 When you have some great cases and experiences and want to share your success with colleagues via an article, providing comprehensive information in the best format can be a challenging but very achievable goal. The adage, “You only get one chance at a first impression,” applies to the written word just as much as a face-to-face meeting. To properly show the many aspects of your successful treatment plan, you need to be familiar with the steps to present it well. You’ve worked too hard to perfect your clinical skills to let them be obscured by missing information. Ensure that your message is delivered in an organized and understandable form.
Developing a clear message is critical to your achievement as an author. To skillfully present findings and treatment plans to patients, your case presentation and information should be clear, concise, and tailored for your audience.
Publishers understand that you are foremost a clinician, not a writer by trade. However, to construct an article, you need to harken back to the basic formulas that you learned in college for constructing an essay.
After my 20-year clinical career as a dental assistant, hygienist, and office manager, I worked for dental manufacturers in an editorial/marketing role. As part of my duties, I had the pleasure of assisting doctors and other dental professionals in delivering their messages. For a case report or practice management article, the process is basically the same. In my experience, the areas where I found I was able to lend the most assistance and guidance was in structure, written content management, and supportive images.
Here are some tips that I hope you will find helpful in your writing journey.
Decide on a style
This will be dictated depending on the type of article. Case studies need a more straightforward, clinical approach to the language and content. Continuing education (CE) articles need to explain or elaborate on a technique, innovative treatment, or technology. CE articles also are written in a formal tone and often must start with an abstract — a paragraph that summarizes the whole article and contains objectives/purpose, materials and methods, and results. The CE must contain citations/references to substantiate your information with another authoritative source. Depending upon the amount of credits offered for your CE, you may need to formulate a quiz. For a nonclinical style article, you can be more conversational. This gives you more of an opportunity to let your personality shine through. These kinds of articles can be enjoyable to write for you and interesting for readers.
Create an outline
To begin any type of article, you need to have a clear direction and path. An outline will help you stay on track to move through the process of generating a cohesive flow of information and ideas rather than jumping around. You must be deliberate in this process. And the good news is, you already know how to do this. Approach your article as you did your patient’s treatment, moving from one step to the next, from one visit to the next.
Clinical articles should include introduction/objectives, diagnosis, treatments in order of occurrence, and conclusion. For nonclinical articles, an outline will also help you to stay on track. Here, the outline should include introduction/objectives or problem to solve and steps you took to solve the issue in order of occurrence, and conclusion.
Generate steppingstones/stages of information
As your outline comes together, you will probably notice that your content is automatically dividing into sections. Before each section, a subhead, or short phrase, can allow for separation and an easier read. Each stage of advancement builds on the story, which can keep the reader involved.
Use concise language
Wordiness can stall the reader’s attention and ultimately cause his/her mind to wander. After all, you are putting lots of time and effort into your presentation and want to engage the reader all the way to the end. As you reread your content, look for places where you have repeated information. Then decide on the best place for that info, and do not repeat unless it is for emphasis or as part of your summary/conclusion.
Move from the general to the specific
For each section, the first sentence or few sentences should set up the topic for that section. For example, if you are discussing treatment, start with what was accomplished with this step of the treatment, and then break down the process. For example, “My treatment recommendation was surgical intervention. To start, I began with the exposure of tooth No. 5, which was impacted. Then I moved to …”
Deliver the proper details
Offer basic yet concise details for each section. For example, “The patient came to my office and had a problem with anterior crowding that needed treatment” is not detailed enough. A better approach would be, “The 14-year-old female patient presented with anterior crowding. I set a course of treatment that included …” Another example, “I was able to move the teeth into correct position,” would be better as “I was able to move teeth Nos. 6 through 11 into correct position.”
When describing what you did, usually a publication will allow you to mention product names, especially if the brand or type of product was integral to the successful outcome of treatment. When mentioning product names, it is best to first state the general product group and then the product name. For example, “As part of diagnosis phase, I recommended a 3D radiographic scan (enter product name, followed by a comma and manufacturer name, city, and state of the company headquarters) …” The exact information that must be included may be indicated by the publisher’s guidelines.
Develop a compelling bio
Most articles require a short biographical paragraph of the author, some as little as 30 words. While you may have 300 words about yourself on your website, you will need to edit down the word count for an article. Most bios will give your educational background, affiliations, and milestones. Choose the most important items that you want your readers to know about yourself, as well as those that make sense for the information you are presenting. Group items in a shortened format as needed. For example, if you belong to your local, regional, state, and national organizations, and you also take many CE courses during the year, you can offer, “Dr. is a strong proponent of organized dentistry and continuing education.”
Make sure your pictures are worth 1,000 words
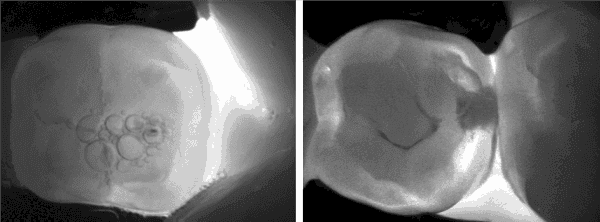
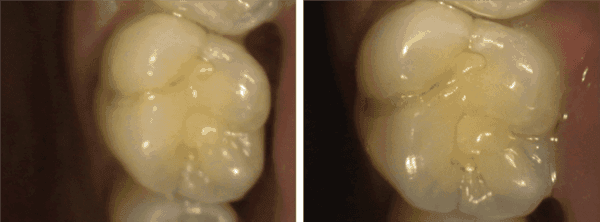
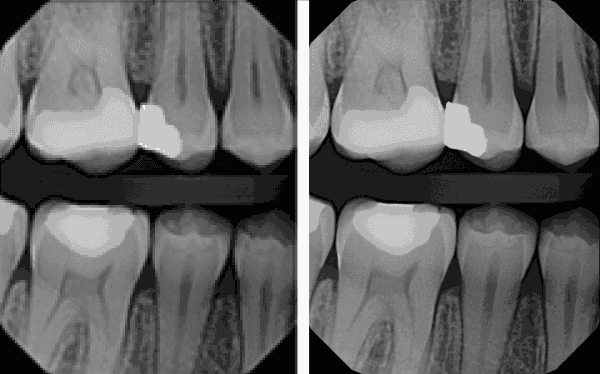
Now that we have covered the written word, let’s move on to supporting images. What I have learned clinically is that images we look at may not be the best in terms of composition and angulation and maybe even dose when it comes to radiation; however, they give us the information we need for our particular task. For example, your hygienist may take a bitewing X-ray where there is some overlap, which can happen due to many factors. However, clinically, if you are only interested in the contact point of two particular teeth for this appointment, that area is clearly shown. On the other hand, although the X-ray may meet clinical needs, it may not be the right resolution or position for a textbook or clinical article.
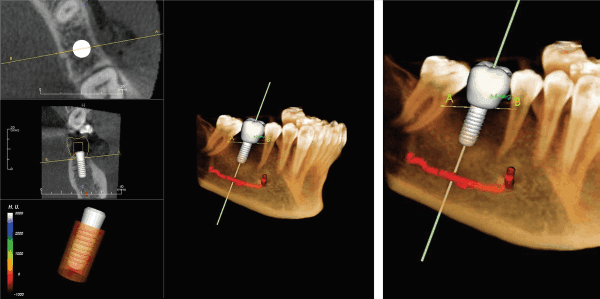
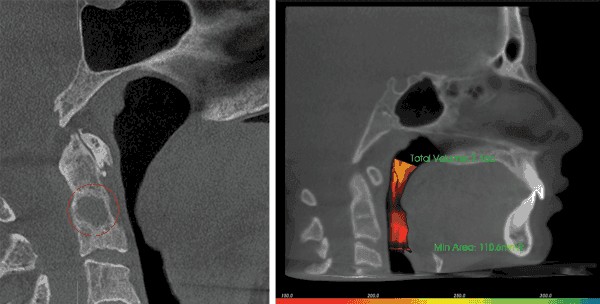
For case presentation in articles, it is imperative that the images meet or are very close to what I like to call “marketing standards.” That is, they are crisp, clear, and presented at the right angle. When they meet all of these criteria, they visually tell the story of the case. This is especially important when showing newer technologies that others may not be familiar with; for example, 3D camera or radiographic images. Your readers need to know at a glance what they’re looking at, what you’re explaining, and how important it is to the case.
Most publishers have guidelines on what size and resolution is required for images. Proper resolution ensures that images will not pixelate when enlarged for print. While high resolution and size is less important for web use, print is another story entirely.
Captions for images can be a summary of the text in the article, or they can have their own message. In the case of the latter, you can offer more information to your reader without creating redundancy. It’s also important to note that most readers will skim article images and captions before reading the entire article, so it is best to create compelling captions.
Ask for help
Editors understand that you are under the time constraints of a busy practice, so they want to save you time and revisions by creating publisher’s guidelines. Typically, these guidelines specify the length, layout, and number of images you can submit for your article. They also share how to add and format references, if needed.
If you are new to the writing process, you may want to ask a colleague to review your article before submitting. Of course, he/she should be someone whose opinion you value, and who will be honest in his/her assessment.
While the publication’s editors will usually edit the text, references, and captions in your article, they may offer additional help if you are unsure about another aspect of your article. Since editors are often extremely busy during article due dates, don’t wait to the last minute. Most are happy to help during the writing process.
You can also seek the assistance of freelance writers that specialize in the dental field. You can find qualified writers through groups such as the American Medical Writers Association or marketing companies that employ writers who are experienced in the dental field.
When it comes to supportive images, often the manufacturer of the imaging product you use (cameras, scanners, X-ray) can offer clinical assistance. This is one activity I really enjoyed when working for imaging companies. Given my clinical background and software proficiency, I was able to help dentists find the best image, best viewing mode, and angulation to tell their stories. I was also able to help with resolution issues. You can begin by asking your product sales representative to make a recommendation within his/her company for someone who can offer a helpful hint or necessary graphic; typically, this is the Clinical Advisor or Product Developer.
If you would like to learn more about image screen capture, resolution, and size, YouTube offers an abundance of information. One video that I found helpful without information overload is “The Confusing Concept of Image Resolution” at https://youtu.be/XqWFfTrorRQ.
Go forth and share!
I hope that this information will give you more confidence in sharing your clinical and professional experiences. You can do this! As in dentistry, it all starts with a plan.
Editor’s call to action
An organized and understandable article is one step towards bringing your message to the public. For “Five ways to differentiate your practice,” read Rich Carnahan’s article.
https://orthopracticeus.com/practice-management/five-ways-to-differentiate-your-orthodontic-practice.
 Jackie Raulerson, RDH, has been in the dental clinical field for 20 years and in dental development and marketing for 17 years. Working with both manufacturers and dental professionals, she helped to establish a strong editorial and social media presence for several global companies. Raulerson now operates her own business to help both dental sectors accomplish their marketing needs. She can be reached at jackie@yourmessagedelivered.net.
Stay Relevant with Orthodontic Practice US
Join our email list for CE courses and webinars, articles and mores
Read our following terms and conditions before subscribing.
