Editor’s intro: With DIY aligners using SureSmile software as the treatment for a patient’s generalized spacing issue, Dr. Edward Y. Lin provided an affordable and effective treatment plan.
Dr. Edward Y. Lin discusses the steps to an affordable clear aligner treatment option
As the old saying goes, “With age comes wisdom.” This is most certainly true with what I have seen transpire over the past 20 years with the inception and development of clear aligner therapy in orthodontics. As a technology embracer and young orthodontist, I readily embraced Invisalign® when it first came to market in 1999 and started my first Invisalign patient nearly 20 years ago in November of that year. Invisalign was without a doubt a disruptive dental technology, and it has forever changed the way we all practice orthodontics because it is a highly desirable treatment option for patients seeking esthetic orthodontic treatment. In addition, Invisalign will forever be known as the first digital orthodontic treatment modality invented by the founders of Align Technology, Zia Chisti and Kelsey Wirth. However, in October of 2017, approximately 40 of Align’s patents expired, which has paved the way for many new clear aligner competitors to come to market.1 With this recent development, orthodontists now have multiple options for clear aligner treatment and at different price points to offer to our patients, which I personally feel is a great thing for orthdodontists and, most importantly, for our patients to have different options for treatment. In this case report, I am going to review a generalized spacing case that I treated utilizing SureSmile’s software applications.
Patient information
This patient presented to me for her new patient examination as a healthy 27-year, 5-month-old adult female. She stated that her chief complaint was that she wanted a nicer looking smile as she did not like her generalized spacing in both maxillary and mandibular arches. Her maxillary (MX) and mandibular (MD) arch forms were slightly asymmetrical and ovoid.
Diagnosis and etiology
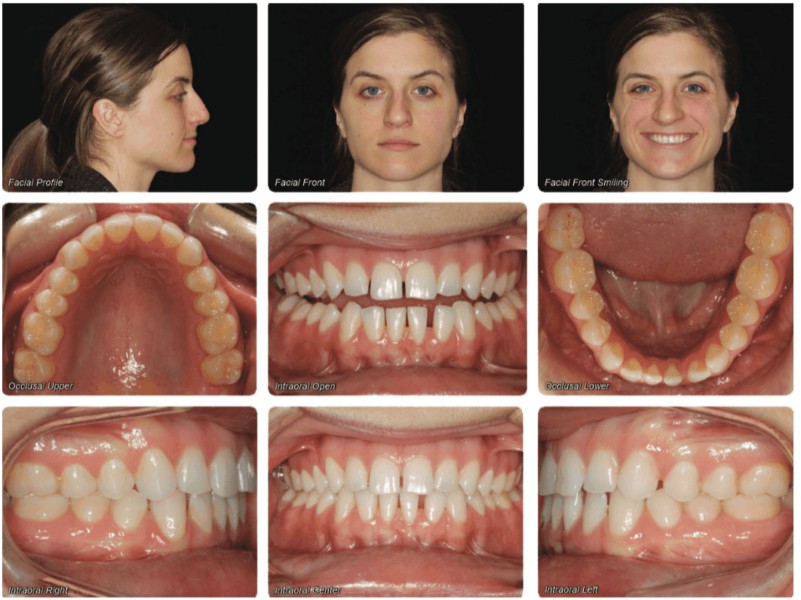
Intraoral examination revealed a Class I malocclusion (Figure 1). She presented with an overbite (OB) of 20% and overjet (OJ) of 1 mm. There was 4 mm of spacing present in her maxillary arch and 6 mm of spacing present in her mandibular arch. There was excess maxillary and mandibular incisal wear present.
Frontal facial evaluation revealed a symmetrical and balanced facial pattern for her upper, middle, and lower facial third heights. Profile evaluation revealed a straight profile with normal chin with nasio-labial angle equal to 120 degrees. Her upper and lower lips were both in normal positions and competent at repose. A frontal smile evaluation revealed acceptable upper and lower smile lines with no buccal corridors present. Her maxillary midline was centered with her facial midline, and her mandibular midline was deviated to her right by 1 mm. The patient was pregnant at this time, so no cephalometric or panoramic X-rays were taken. Instead, we evaluated the periapical and bitewing radiographs from her dentist, which displayed very good dental health.
Treatment summary
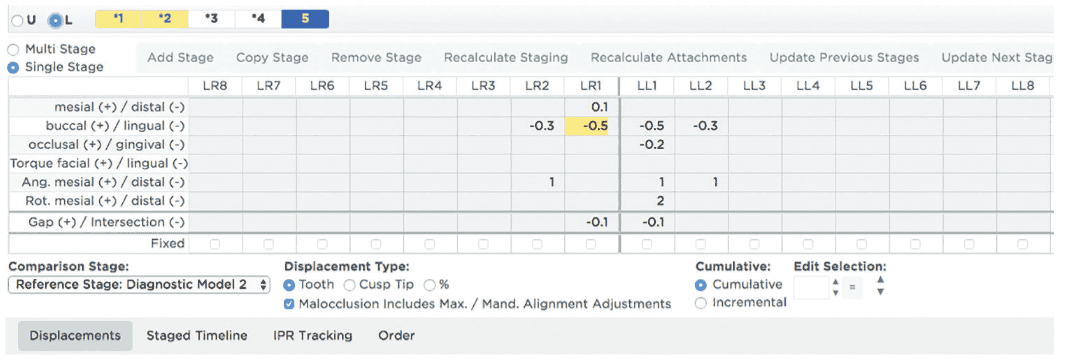
This patient expressed a strong desire for an esthetic orthodontic treatment option. As a result, DIY aligners using SureSmile software were proposed to her as the treatment option of choice. An intraoral scan was taken and was then uploaded to SureSmile for both maxillary and mandibular DIY aligner design to create her Diagnostic Model 1 for staging of her aligners. At this time, we were still in the process of setting up our digital lab and 3D printers. As a result, we were scheduling 6 weeks in between the intraoral scan and the aligner delivery to give our digital lab enough time to create the aligner stages, to have the doctor review the individual aligner stages, to 3D-print the models, and then to fabricate, package, and label the aligners.Currently, we can do all of this in 1 week if necessary, but we typically schedule 3 weeks in between the intraoral scan and the aligner delivery to not stress our digital lab. The aligner stages were created by our digital lab and then approved by me for both maxillary and mandibular arches. There were a total of 11 maxillary aligners and 10 mandibular aligners with tooth movements for U3-3 and L4-4 only (Figures 2 and 3).


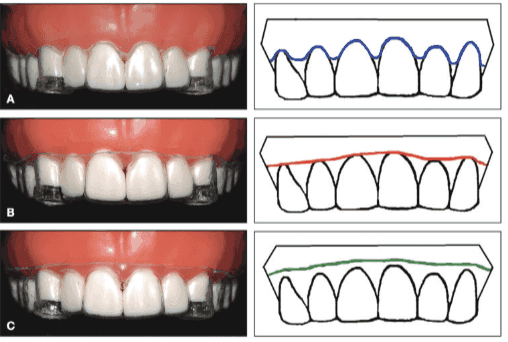
Six weeks later, the patient returned to our practice for her DIY aligner delivery. A total of five maxillary and five mandibular aligners were given to the patient with instructions to change her aligners every 2 weeks and to wear them 20 hours per day. There were no attachments prescribed for her as my aligner philosophy tries to minimize attachments necessary during treatment. As clinicians, we should remember that with aligner therapy, patients do not like attachments, especially in the maxillary anterior region. My aligner philosophy for attachments is based off of a research study performed at the University of Nevada, Las Vegas, which has demonstrated that trimming the aligners 2 mm past the gingival margin increases retention of the aligners by 4 times in comparison to a scalloped trim (Figure 4).2 As a result, our lab trims our aligners with a straight cut 2 mm past the gingival margin, which minimizes the need for attachments. Another important factor for retention is the size or surface area of the clinical crowns. Larger clinical crowns will have greater retention, and smaller clinical crowns will have less retention. Undercuts are also another important factor for retention. For spacing cases, our lab does wax out slightly between the spaces. However, there is a great deal of retention still in the areas of spacing.
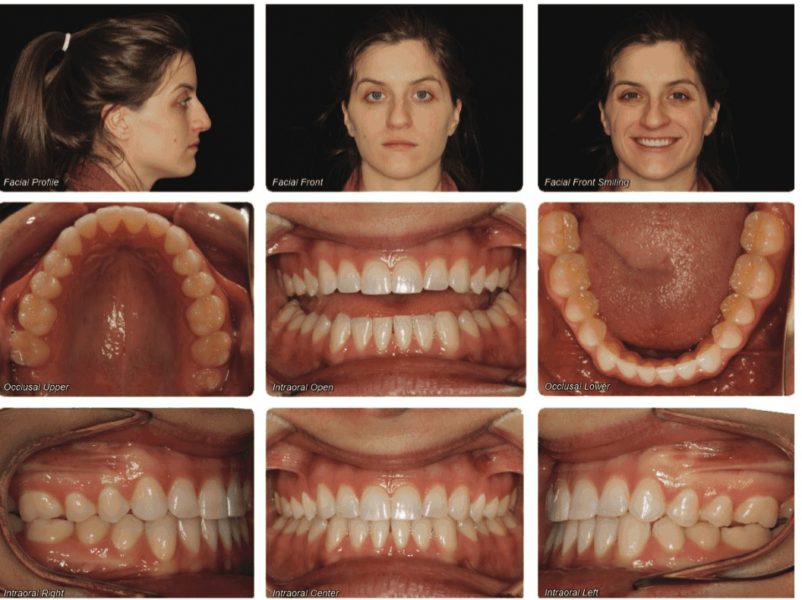
A few months later, the patient returned to our practice for delivery of her remaining aligners (Maxilla – Aligners 6 – 11 and Mandible – Aligners 6 – 10). The patient returned to our practice for aligner refinement, and a second intraoral scan was taken on the patient with updated photos to create her Diagnostic Model 2 for staging of her refinement aligners (Figure 5). Her refinement aligner stages were created by our digital lab and then approved by me for both maxillary and mandibular arches. Again, no attachments were prescribed. Her refinement aligners were then delivered. There was a slight delay in her treatment of approximately 1 month due to the delivery of her baby. Almost a year after the initial intraoral scan was taken, the patient’s DIY aligner design treatment was completed. Because of her generalized maxillary and mandibular spacing, we direct-bonded U2-2 and L3-3 lingual splints. An intraoral scan was taken for her final retainer, which was given to her about 1 week after treatment completion. Her total treatment time in DIY aligners from delivery of her initial aligners, including the time for staging and fabrication of her refinement aligners, was 10 months and 2 days.
Summary and conclusions
It is my belief that we are now entering the next stage of development for aligner treatment in our esteemed profession of orthodontics, where the orthodontist is now taking back control of treatment in the digital biosphere because we now understand how to treat in the digital world. The digital era of orthodontics for treatment began with Invisalign in 1999. However, from 1999 to the present time, many other digital orthodontic technologies have emerged (SureSmile®, Insignia™, Incognito™, eBrace, Harmony, ClearCorrect, etc.). We as orthodontists now have many different options for digital orthodontic treatment for labial- and lingual-fixed appliances and even more so with aligner therapy. As a result, over the past 20 years, many clinicians are now very comfortable treating with digital technology, and the younger generation of orthodontists is even more comfortable since they have grown up with technology in their hands from childhood.


In our three practices, we have chosen OraMetrix as our preferred aligner partner for four reasons:
- SureSmile’s software applications give us superior control for staging, which I personally feel gives us better treatment outcomes for our patients.
- SureSmile’s Cloud is phenomenal, fast, and reliable. I have worked on cases on SureSmile’s Cloud all over the world in my travels over the past 15-plus years with no issues.
- OraMetrix understands the importance of digital workflow and has created an incredibly efficient digital workflow system. We use it every single day in our clinics, and it helps the clinics to flow seamlessly. Sure-Smile’s digital workflow platform has been in existence and continuous development for over 20 years, and there are no other companies other than Invisalign that have that much history in the digital orthodontic world or understands it as well.
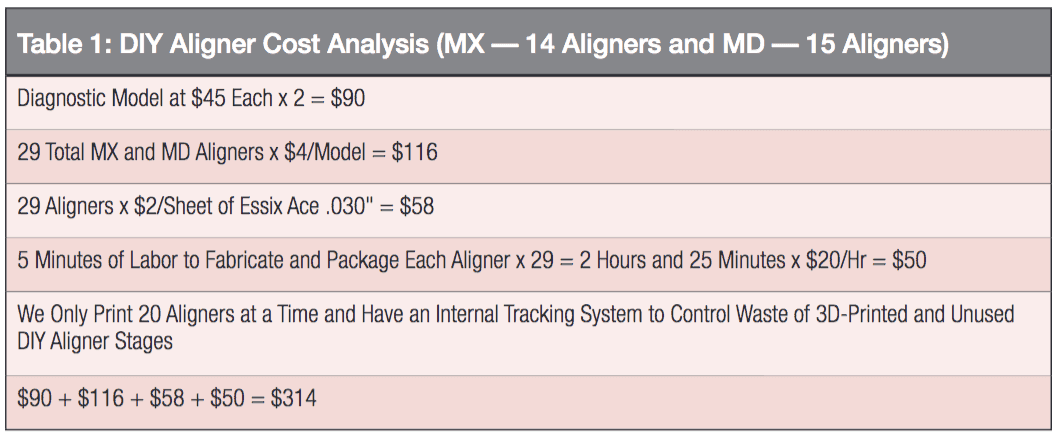
- Finally, with DIY aligner design, we can now control our aligner overhead expenses much better by staging and fabricating the aligners ourselves. We have two digital orthodontic labs with five 3D printers (three Structo Dentaforms, one EnvisionTEC Vida 3D, and one Envision One). We print all our models and then fabricate all our aligners within our two This obviously has resulted in significant savings with the cost of our DIY aligners for our three practices. I have provided a cost breakdown for this patient’s case report for review (Table 1). The total cost for labor and supplies for this aligner case was $314. The only cost that was not factored into this cost analysis is for my time in evaluating her case.
 This SureSmile DIY aligner design case that I have reviewed in this case report is the perfect example of what happens to any sector of business, whether in industry or healthcare, when a technology goes mainstream. In this case, it pertains to clear aligner treatment in orthodontics. Technologies will always continue to evolve, develop, and improve, and this is true for clear aligner technologies as well. In addition, with increased utilization, this results in decreased expenses. Because of this cost savings, we can offer aligners to our patients at a lower cost but still make the same profit margin. In my opinion, this is a win-win for us as clinicians as well as for all our patients. I do know that my patients love hearing that I can offer them a more affordable clear aligner treatment option than my competitors. Plus, with the SureSmile software platform, I have added flexibility to seamlessly use the higher experienced TechCenter in Dallas, Texas, to fabricate my aligners, such as when I have greater demand than planned or am gearing up a new office. In my opinion, this is just smart business practice, and that is a beautiful thing!
After reading about Dr. Lin’s innovative treatment using DIY aligners using SureSmile software, read a CE by Dr. Antonino Secchi about using aligners and integrating data from intraoral scanning and 3D imaging.
 Edward Y. Lin, DDS, MS, has 15-plus years of experience and over 5,000 patients treated with SureSmile. Dr. Lin grew up in Green Bay, Wisconsin, and after graduating from Abbot Pennings High School and the University of Chicago, continued his dental education and orthodontic residency at Northwestern University Dental School. He is a member of the American Association of Orthodontists, the American Dental Association, and the World Federation of Orthodontists as well as state and local dental societies. Dr. Lin has been in private practice since 1999.
Disclosure: Dr. Lin is a speaker on advanced orthodontic technologies, including SureSmile, i-CAT™ 3D imaging, and Invisalign®. He also sits on the clinical and faculty advisory board for SureSmile and the advisory board for American Orthodontics.
- Tindera, M. Bracing for Competition. Cheaper Challenger’s Enter Invisalign’s 1.5 Billion Market. Forbes: May 2, 2018.
- Cowley, D; Mah, J; O’Toole, B. The Effect of Gingival-Margin Design on the Retention of Thermoformed Aligners. J Clin Orthodontics. 2012, 46(11):697
Stay Relevant With Orthodontic Practice US
Join our email list for CE courses and webinars, articles and mores
