Dr. Isaak Yelizar illustrates how he used Angel Aligner treatment plans with angelButtons to simplify complex cases.
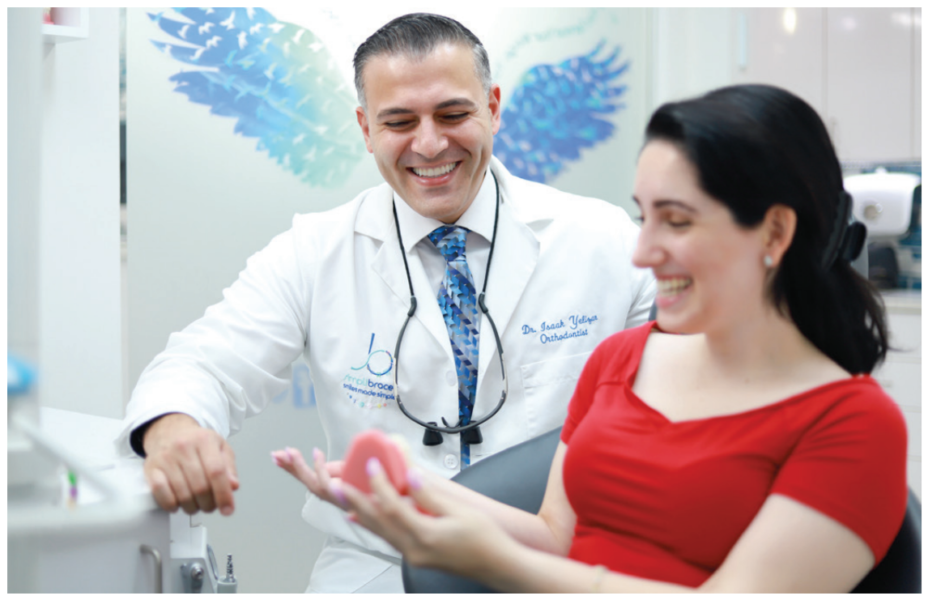
Dr. Isaak Yelizar describes treatment with Angel Aligner™
Like many of you, my first experience employing aligners was with the leading brand. Since then, I’ve had considerable involvement with various aligner systems and am always open to exploring new options, driven by Leonardo da Vinci’s maxim, “Simplicity is the ultimate sophistication.”
As an early adopter, any new offering I consider must demonstrate a distinct advantage over current techniques to simplify the complex case management issues we encounter in daily practice. When I was introduced to Angel Aligner, it was explicitly the angelButton that intrigued me.
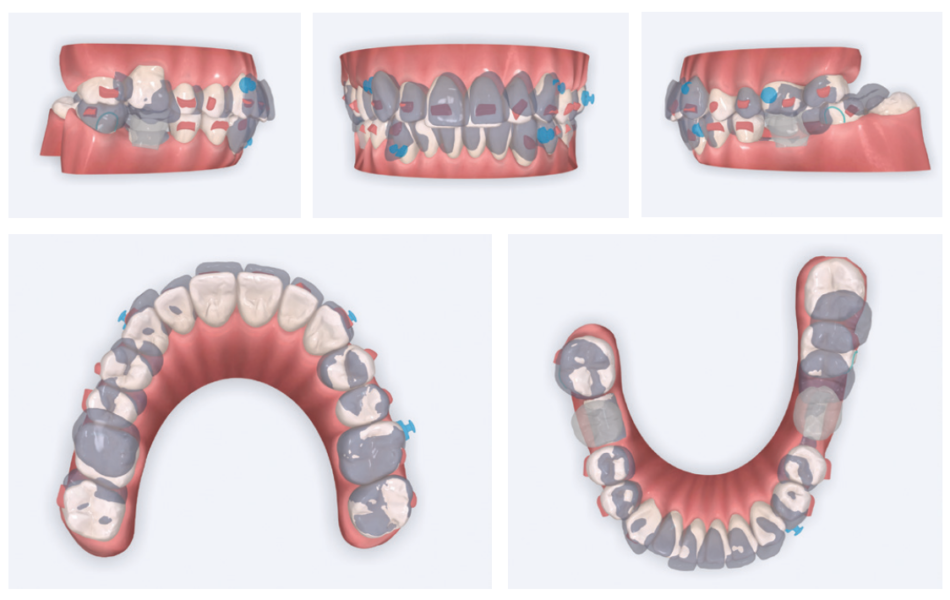
Angel Aligner with integrated angelButtons have transformed my approach to demanding cases. The angelButtons can be positioned on four to eight points on any tooth (Figure 1). With traditional hooks and bonded buttons, multidirectional movement is limited, and force is concentrated on the specific tooth to which the elastic is engaged.

The flexibility in positioning angelButtons creates an entirely new force dynamic for controlling the direction of tooth movement. Moreover, elastics can be attached to apply force to a single tooth, a quadrant, or an entire arch. Distributed anchorage is a significant advantage in treating any number of case types. It is particularly important in treating excessive gingival display through full-arch impaction.
With angelButtons, there is little need to bond buttons except perhaps when a specific tooth needs to be extruded or rotated. This precludes distortion that can occur with cutouts. Unlike hooks or bonded buttons, angelButtons maintain their original positions and shape and resist deformation and fracture. Compared with other aligners which are flexible and prone to deflection, Angel Aligner’s are constructed of three layers of a high-polymer material of a specific chemistry that resists deflection yet has an adaptability that hugs the teeth to move them efficiently to their planned positions.
The company has 20+ years of global experience with more than one million cases treated. Patient response to Angel Aligner has been overwhelmingly positive. Most comment about how clear and comfortable the aligners fit, even with elastics, and how quickly they see their smiles change.
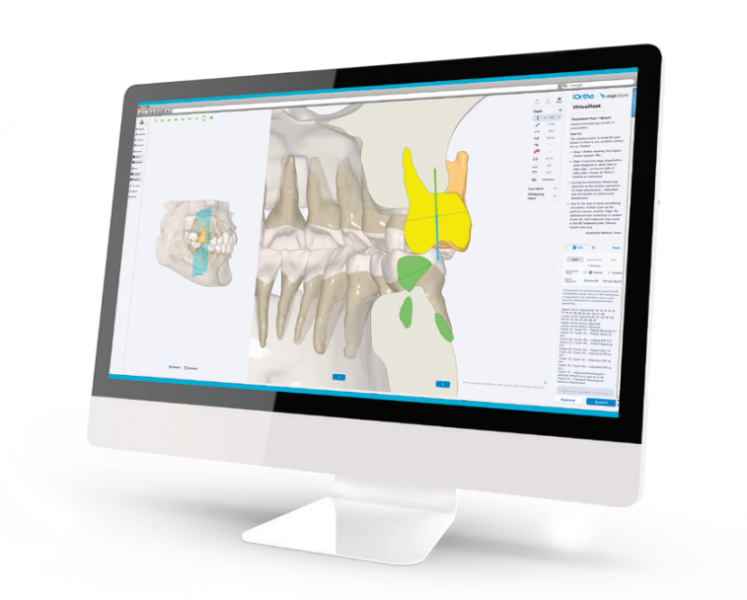
The iOrtho™ treatment planning software offers all the benefits I’ve come to expect from a sophisticated treatment planning system. For those doctors with CBCT, the software accurately produces the 3D morphology of patients’ roots and alveolar bone (Figure 2). For traditional radiographic examinations, the system uses AI to create tracings and superimpositions to achieve the best possible tools to support diagnoses and treatment plans.
Many additional Angel Aligner features have proven effective in my practice, including traditional and precision attachments, pressure ridges, virtual roots, and a choice of trim lines. While virtual roots do not offer an identical bone-to-root relationship, they are an indispensable aid in determining the initial direction of tooth movement.
As for trim lines, we can choose between scalloped, high, or hybrid, which is a distinct advantage over other aligner systems. High trim lines are best suited in the posterior during distalization and intrusion. They also accommodate patients with short clinical crowns and those who prefer fewer attachments. Angel Aligner’s technicians are highly trained specialists so skilled that it usually takes only one or two revisions to approve my case setups.
As people worldwide seek to improve their appearance, a broad, attractive smile is often their priority. While orthodontic treatment can significantly improve one’s smile over a wide range of malocclusions, issues such as excessive gingival display usually necessitate orthognathic surgery with an involved orthodontic setup. Treatment using fixed appliances or aligners with TADs can preclude surgery but has historically required additional, intricate mechanics and considerable doctor involvement. With the advent of Angel Aligner, orthodontists now have an appliance that eliminates surgery for treatment of excessive gingival display, offering a simple orthodontic solution instead.
My experience with Angel Aligner began post-2023 AAO, so no complex cases are yet complete. Still, two such cases, including a gummy smile case, are close to finishing and showcase the benefits of this sophisticated aligner system.

Case 1
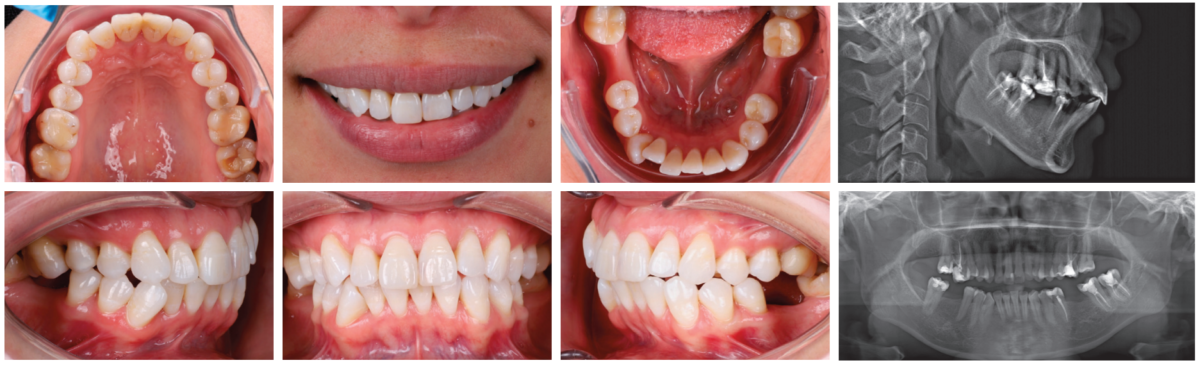
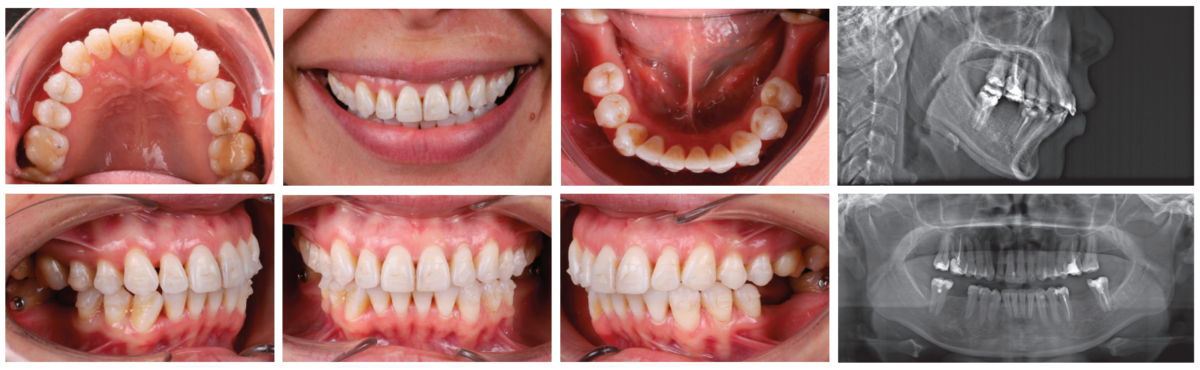
Patient A.M., age 28, presented with excessive gingival display she wished to correct (Figure 3). She lives in Boston and was willing to travel 3 hours each way to our practice in Queens, New York. Multiple orthodontists near her home had prescribed surgical intervention for her case, but she had seen a gummy smile patient of mine treated nonsurgically and was excited about the prospects for herself (Instagram @NYCorthodontist).
Diagnosis
Mesocephalic in CL 1 occlusion with slight constriction in the posterior areas. The patient’s facial and cephalometric analysis appeared normal, and her facial thirds were well balanced. Looking closely at the Digital Smile Design Analysis (Figure 3), we can appreciate the excessive gingival display, ranging between 4 mm-6 mm in the posterior and 3 mm-4 mm in the anterior.
Treatment plan
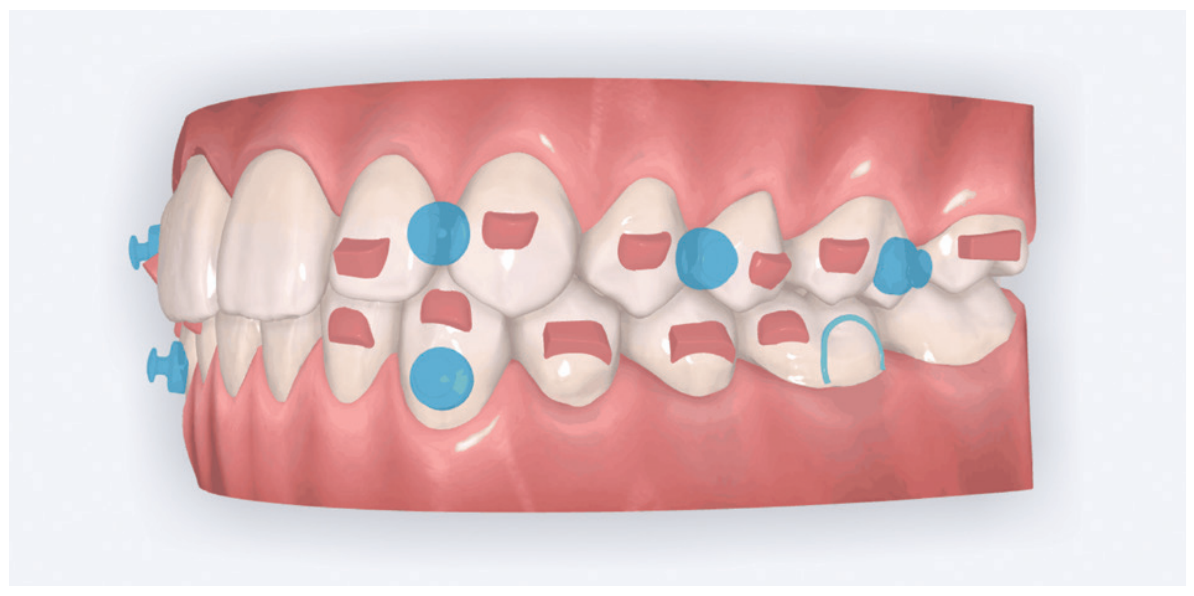
Maintain CL I occlusion. Develop the transverse relationships, eliminate the posterior negative root torques, and resolve the excessive gingival display via full-arch nonsurgical impaction. All vertical changes would be accomplished using only Angel Aligner, TADs, and elastics. Her maxillary lateral incisors may later require buildups to improve the Golden Proportion of the anterior teeth. My iOrtho software setup for maxillary intrusion was to place angelButtons (blue) between the U2s-3s, U4s-5s, and distal of the U6s (Figure 4).
My TAD placement protocol involved placing four TADs in the maxilla: two interradicular in the anterior and two infrazygomatic (IZC) in the posterior. The 2 mm x 12 mm IZC TADs were placed extra alveolar, so there was minimal risk for root impingement (Figure 5). Anteriorly, the 1.4 mm x 6 mm interradicular TADs were placed between the roots of the U2-3s, so greater care was required.

The biomechanics of impaction
Figure 6 demonstrates the typical iatrogenic side effects of full-arch maxillary impaction with TADs and elastics. Forces and moments are the key players in tooth movement. Forces are always “visible,” but moments must continually be “envisioned.” Elastics pull from TADs to bonded buttons creates both vertical and horizontal forces, which can lead to iatrogenic moments that cause labial crown torquing.

To manage this phenomenon, practitioners must employ additional mechanics. Some might choose to bond segmented wires occlusally and lingually; others might place additional TADs positioned labially and lingually for sling elastics worn over the occlusal surfaces. Since this was my first Angel Aligner gummy smile case, I designed and had fabricated a customized TAD-anchored palatal appliance to counter any unwanted crown torquing. Thankfully, this appliance did not need to be employed because of the integrated angelButtons and the inherent deflection-resistant properties of Angel Aligner.
Treatment progress
Doctor time in such cases is minimal: designing the setup and bonding the attachments. Other techniques to achieve full maxillary arch intrusion usually require monthly visits to reactivate the power chain to the TADs. Angel Aligner allowed us to send the patient home with all the aligners and elastics needed to manage the treatment herself. The patient would be seen every 8 weeks for close observation. With virtual monitoring, we would likely see such patients every 12 to 16 weeks.

Case progression (Figure 7)
Even at 4 months, treatment was already changing this young woman’s life. With exemplary patient compliance, there was a marked change in her smile architecture. Arch development had begun, and the buccal corridors were starting to fill in. At 10 months, the vertical changes in the posterior continue without any significant labial crown torquing of the posterior segments.
Case discussion
My question at the start of treatment was whether this demanding case could be treated only with Angel Aligner and TADs or if additional mechanics would be needed to preclude unwanted posterior labial crown torquing. Angel Aligner alone proved sufficient to deflect nearly all unwanted torquing.
Such transformative results not only change people’s lives but also inspire my continued passion for this profession. Angel Aligner and TADs give orthodontists an incredibly valuable approach for treating patients with excessive gingival display and other complex issues. I hope this patient’s treatment motivates readers to see for themselves how these advanced techniques can achieve similar results for their patients, simply and effectively.
Case 2
Patient S.T., age 32, presented in the hope of creating a radiant smile and a functional bite. She had been dealing with dental problems all her life. Her X-rays exhibited multiple direct restorations as well as endodontic treatment. Due to the loss of her molars, her teeth had shifted considerably over the years. Her dentist recommended she see us to create a pleasing smile and to rehabilitate her occlusion for future prosthetic treatment (Figure 8).
Diagnosis
The patient’s occlusion was super CL I on the left and CL II on the right. Both arches showed slight constriction with lower anterior crowding. Her smile arc was canted, and both midlines were shifted in opposite directions. On cephalometric analysis, her ANB was 5.84, and IMPA was 102.64, both representative of skeletal Class II with incisor proclination. There were two long-standing extraction sites into which the UR6 and UL6 (partial) had supraerupted. Her thin gingival mucosa posed a challenge in keeping the roots in the bone, so treatment had to be planned correctly and executed gradually to maintain her gingival architecture.
Treatment plan
Use Angel Aligner to sequentially distalize the UR and LL quadrants, correcting the AP relationship and obtaining midline coincidence (Figure 9). Intrude the supraerupted U6s to prepare the extraction sites below for implants. To preclude root resorption and fenestrations, careful attention would be paid to tooth movement velocity and the sequencing of those movements.
In the past, I would have used fixed appliances and TADs to treat this patient. I considered adding a TAD in the IZC area to intrude the supraerupted UR6, but I wanted to see what Angel Aligner alone could achieve.

Case progression
At 4 months, the maxillary right side had distalized with appreciable space created between the canine and first premolar (Figure 10). At 9 months, this patient has a wide, attractive smile emerging (Figure 11). We can also appreciate the transverse development, arch coordination, and mandibular labial crown torque control. Note how well her tissue responded to the slow, gradual changes with no gingival recession. This is simplicity.
Case discussion
This patient’s multiple dental and occlusal issues were resolved solely with Angel Aligner. Both U6s were intruded without needing TAD support or additional mechanics to preclude labial crown torquing. Angel Aligner proved more than adequate in displacing the UR6 vertically while simultaneously distalizing it into Class I (Figure 11). To be able to intrude and distalize simultaneously with no need for TAD-supported anchorage speaks to the exceptional capability of this appliance.
Many dental colleagues in my area would likely have either extracted the UR6 or performed a coronal hemisection in the hope of creating enough interocclusal space for the LR6 implant placement and restoration. Sharing this case with referring dental colleagues will demonstrate how orthodontics can create adequate space for implant sites while performing minimally invasive dentistry.
Conclusion
Angel Aligner with integrated angelButtons have given me an effective new approach to treating a wide range of case types. It is a game changer for simplifying complex cases, and I now consider it essential to my practice as my exclusive brand of aligners. I always prefer a simple treatment plan. Less is more. Angel Aligner supports my philosophy of creating consistently predictable, beautiful finishes that change people’s lives. I look forward to exploring all the benefits this remarkable appliance will continue to bring to my practice and my patients.
Stay Relevant With Orthodontic Practice US
Join our email list for CE courses and webinars, articles and mores
