Dr. Lloyd Taylor discusses an easy, efficient and painless way to perfectly align contacts with Tie-On Rotation Wedges.
Dr. Lloyd Taylor presents a detailed technique using Tie-On Rotation Wedges on a finishing archwire to perfectly align contacts
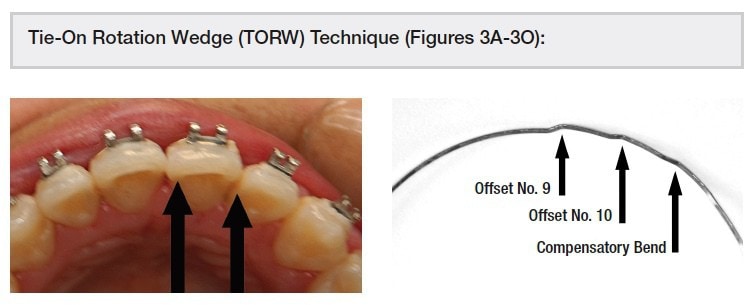
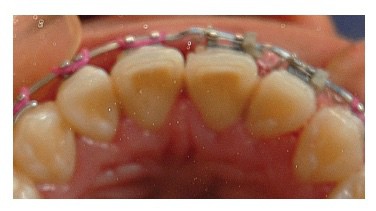
Ideal occlusion is the ultimate goal of ortho-dontic treatment. Patients expect perfectly aligned teeth and are aware of the slightest irregularities. Tie-On Rotation Wedges (TORW) are an easy, efficient, and painless way to correct rotations and achieve ideal proximal contacts in one or two office visits. This article presents the clinical steps for bending offsets in stainless-steel finishing archwires and the placement and application of TORW.
Rotation wedges were invented by Dr. Cecil Steiner, an orthodontist famous for his Steiner cephalometric analysis. His rigid stainless-steel wedges were available in either a small or large size on a .010″ stainless-steel wire. However, now with the TORW, both sizes of his rigid Steiner stainless-steel wedges are replaced with one flexible urethane wedge, which is easily pulled between the tooth and archwire. To produce the desired tooth rotation and perfect alignment of proximal contacts, an offset will need to be created in the finishing archwire. This offset, which is the exact height of the step between the tooth contacts, is driven into the bracket slot while the two wire legs of the TORW are cinched down to produce the perfect tooth alignment.

Tied-On Rotation Wedge is composed of two parts:
- Urethane wedge — body, seating groove, and two ridges
- The two legs are formed from a 14″ length of .010″ stainless-steel wire bent to form the two 7″ lengths.
Only four instruments are used in the placement of either clear or gray TORW:
- Double Ended Ligature Director Large Tips (Cat. No. 878-205). The “V” straight end is larger than previous ligature directors for easy and secure placement while driving the finishing wire offset down into the bracket slot. This instrument is also ideal for the 90° bend and tucking in of the wire pigtail under the archwire at the end of placement.
- Tweed Arch Plier (Cat. No. 871-131). For bending precise width and angle offsets in round or rectangular stainless-steel finishing archwires.
- Wide 4 mm Mathieu Wire Twisting Hemostat (Cat. No. 878-540). The jaws of this hemostat have been specially designed to securely hold the twisted .010” legs of the TORW as the wire legs are cinched down. Narrower Mathieu plier tips such as Smaha Mathieu, used for placing elastic O-rings, are too fine for twisting steel wires.
- Pin and Ligature Cutter (Cat. No. 871-173). For the precise cutoff of the twisted wire pigtail.
- Gray Wedges (Cat. No. 618-982) for stainless-steel brackets and Clear Wedges (Cat. No. 618-992) for clear brackets, each in packs of 10 TORW.

There are 4 basic steps in the placement of TORW:
- Marking and measuring (Figure 3A)
- Wire bending and insertion (Figures 3B and 3C)
- Wedge placement and cinching (Figures 3D-3L).
- Wedge finishing (Figures 3J-3O).
Tie-On Rotation Wedges are a specialized and unique tool for achieving the perfect tooth rotations sought by orthodontists and expected by patients. Part 2 in the future will explore the fine points and advanced techniques with TORW.


As orthodontists seek ways to perfectly align contacts, Dr. Thomas Shipley found a way for better aligner seating. Read the article here.
https://orthopracticeus.com/technology/vpro5-efficient-aligner-seating-high-frequency-vibration
 Lloyd R. Taylor, DDS, received his DDS degree from Fairleigh Dickinson Dental School. He first completed a 3-year residency in Oral and Maxillofacial Surgery and Anesthesiology and was Chief Resident at the Albert Einstein College of Medicine/Jacobi Hospital in New York City. Dr. Taylor then completed a 3-year Fellowship in Orthodontics at the Harvard School of Dental Medicine. Dr. Taylor also completed an additional 3-year Fellowship in Orthodontic Teaching and Research at the Forsyth (Harvard) Dental Center. He has practiced both Oral Surgery and Orthodontics in North Hollywood, California for more than 50 years.
Disclosure: Dr. Taylor is both the founder and president of OrthoSource since 1985.
Stay Relevant With Orthodontic Practice US
Join our email list for CE courses and webinars, articles and mores
