 So you have purchased your Propel devices and are staring at them wondering how to incorporate this into your office routine. How do I train my staff on the setup and delivery? What other supplies do I need? Before you can even get to that point, how do I discuss this with patients? How can I efficiently and effectively frame the conversation?
This article will attempt to discuss what you need to know to seamlessly integrate Propel in your chairside procedures and discussions with patients, to proactively speed up overall treatment time or reactively to release stubborn movements with braces or aligners.
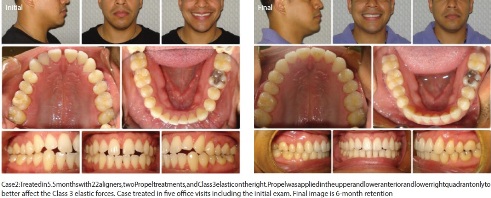
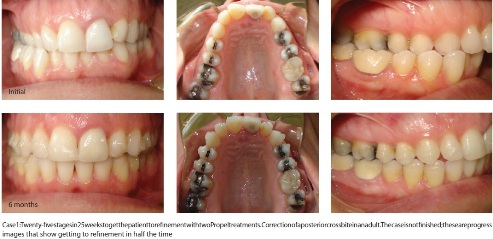
“Propelling Orthodontics” is more than simply moving teeth faster; it’s about propelling your office and making it stand out in your area. It is most impactful to harness the marketing aspects that Propel can offer you. Internal and external marketing efforts can easily pique interest for patients considering treatment who were reluctant to begin due to the potential length of treatment time. Combine that with straightening teeth using aligners and not braces, and you have a marketing strategy like never before in our industry. Here is an example of messaging during the initial exam for the “proactive” approach with Propel:
 “I now have the ability to reduce your treatment time by almost half using Propel Orthodontics technology. With Propel, I use a strong gel on your gums for about 4 minutes and get you numb. I then manually create small dimples through the gums into the bone between the roots of the teeth. This stimulates the cellular activity and allows the bone to turn over faster; therefore, the teeth will move faster. I can have you switch your aligners out weekly instead of every 2 weeks. There is no recovery time or swelling to deal with. The numbness wears off in about an hour, and you can go about your day without any disruption.” For those patients that might be reluctant to use this method, I then continue to frame the conversation this way: “People go to plastic surgeons every day of the week and have acid peels, laser peels, and walk around like a burn victim for 2 weeks under a hat and big sunglasses so no one notices. Not to mention other plastic surgery procedures that produce swelling and bruising with much longer recovery periods that might be socially undesirable.
With Propel, there is none of this, and you get the result you want in half the time!” The next question often is about the cost. Some offices charge a flat fee regardless of the number of Propel procedures. Typically this flat fee is 7%-10% of the total treatment fee. Others frame the conversation by saying it is an additional $45 a month for the “X” number of months of treatment. Do whatever it is you do currently in your practice when incorporating technologies into your treatment fee, keeping in mind that with Propel, you will also be significantly reducing the number of office visits to complete the case in a reduced amount of treatment time, thus increasing profitability per visit in a profound way.
Messaging for the “reactive approach” is similar in describing the procedure, but is slightly altered to address the given clinical situation (stubborn rotation or space closure).
An example of “reactive” messaging is, “As we can both see, it has been challenging to resolve this rotation (or close this space) over the last few appointments. To help facilitate the total correction and potentially cut out several office visits, I can use Propel to help temporarily soften the bone to better allow the teeth to move. It will only take a few extra minutes to perform.”
Some doctors charge a per procedure fee in cases like these while others do not as they realize the cost savings of correcting the movements in one visit compared to three to four visits to complete the same movements. It is up to the discretion of the doctors to do what they feel is best.
Anesthesia
A potential mental hurdle for the practitioner to get over is the notion of giving anesthesia as they may have not done this since dental school. This conversation is no different than the one with the advent and use of TADs in orthodontics. For those who are not comfortable with a local infiltrative anesthesia, a profound gel from a compounding pharmacy can be used as an alternative.
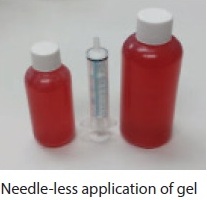
The formulated topical gel that is best is known as “The Baddest Topical in Town (BTT 12.5).” Its ingredients are lidocaine 12.5%, tetracaine 12.5%, prilocaine 3%, and phenylephrine 3% gel. Often used before laser procedures, gingivoplasty, and implant exposures, BTT 12.5 is a combination of three anesthetic ingredients and a vasoconstrictor. BTT 12.5 has been used as an alternative to local anesthetic injectable solutions. Depending on local state laws, qualified staff may be delegated to apply the gel. There are a few methods to apply the gel. Staff can use a needle-less, disposable, plastic syringe and draw up the gel from the bottle for easier application. It is not recommended to use a Q-tip to apply it as this has proven to be hard to manipulate the gel, and often insufficient amounts are carried by the end of a Q-tip, so it has proven to be a less controllable method.
Option 1
After the area to be Propelled is isolated and dried, the doctor or staff member can take the filled disposable syringe and spread the gel over the desired area while gently pressing the plunger with their thumb. It is recommended that it be spread on both fixed and movable mucosa. It is best to allow the gel to sit for 4 minutes. It is important to monitor the gel to ensure it does not run into the back of the throat. To prevent this, after the gel is applied, some have placed a cut/trimmed piece of gauze over the gel to act as a mesh-scaffold latticework to help keep the gel in place.
Option 2
An alternative method for gel application is to trim pieces of gauze into strips and liberally apply the gel to the strips while they are on your chairside unit. Using cotton pliers, those strips can then be picked up and delivered to desired area to be Propelled. View a tutorial at ortho-us.link/1BMHDA1
Using this method, careful attention must be paid to ensure clinical crowns do not interfere and inadvertently remove some of the gel from the gauze strips. This will decrease the amount of gel being applied to the area and may prevent applying the gel to the un-attached tissue. After 4 minutes, use high-speed suction to remove the gross amount of gel followed by wiping the tissues with wet gauze to ensure that all has been removed. It is normal that the tissue becomes slightly blanched due to the vasoconstrictor in the formulation. It is recommended to allow the anesthetic to fully penetrate the periodontium for another 10 minutes before proceeding with the Propel procedure. Please follow proper Propel protocols related to sepsis control, location, and depth selection as well as analgesic recommendations and repeating the procedure as needed. Although many are using topical exclusively in most areas of the alveolus, personally I still use infiltration with my patients. More on these topics in future editions of “Propelling Orthodontics.” 
Stay Relevant With Orthodontic Practice US
Join our email list for CE courses and webinars, articles and mores


