Editor’s intro: Dr. Cory Costanzo uses clear aligners to treat a patient with an implant, crowded lower teeth and a narrow smile. Read about the steps needed to provide this patient with positive results.
Dr. Cory Costanzo describes clear aligner therapy for a patient with an implant
Over the past decade, we have witnessed a dramatic increase in the use of clear aligner therapy to provide orthodontic treatment. Fueled by advances in intraoral scanning, computer aided design, and 3D-printing technologies, clear aligner therapy has progressed from an appliance that many practitioners considered only for limited treatment to a comprehensive treatment option applicable to a wide variety of malocclusions. In the past several years, a number of new clear aligner treatment options have been introduced to the market. This influx of new ideas and perspectives continue to push the treatment modality forward. This article presents a case treated using the SureSmile® aligner system.
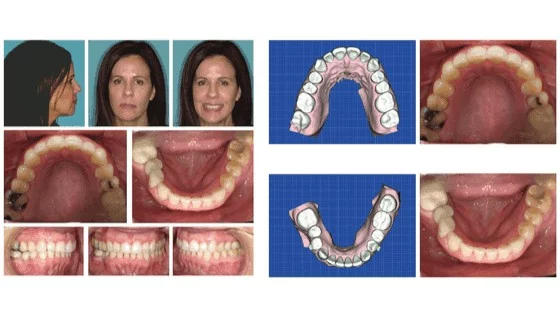
A 37-year-old female with a chief concern of crowded lower teeth and a narrow smile was originally evaluated in 2010 (Figure 1). She presented with a slightly convex profile. On posed smile, she displayed 80% of her upper incisors and had prominent buccal corridors. Occlusion was a Class I molar and cuspid relationship on the left and an end-on Class II molar and cuspid relationship on the right. Mandibular midline was deviated 1 mm to the right. The patient had 4 mm of overjet and 3 mm of overbite with mild maxillary crowding and moderate mandibular crowding.
The lower right second bicuspid and lower right second molar were missing, and the patient was interested in options for addressing the missing teeth. Three options were discussed:
- Comprehensive orthodontic treatment with fixed appliances to level and align. Upright LR6 and setup for implant LR5. Use Class II elastics on the right side to correct to a Class I and to establish coincident midlines.
- Comprehensive orthodontic treatment with fixed appliances to level and align. Use TAD anchorage to protract LR6 into LR5 space and attempt to protract the lower right side enough to establish a Class I occlusion and correct the mandibular midline deviation.
- Comprehensive orthodontic treatment with clear aligners. Attempt to upright LR6 and setup for implant LR5. Use Class II elastics on the right side to correct to a Class I and to establish coincident midlines.
Option 2 was not recommended because of the difficult anchorage requirements involved with both closing the LR5 space and correcting the end-on Class II. Protracting LR6 would also leave UR7 and UR6 unopposed. Treatment with fixed appliances was presented as preferred over clear aligners due to concerns with how well clear aligners would be able to upright LR6. These concerns were a result of both the state of clear aligner therapy in 2010 as well as a lack of confidence on the part of the practitioner. The patient, however, was unwilling to go through treatment with fixed appliances, so she decided to forgo orthodontic treatment at that time.
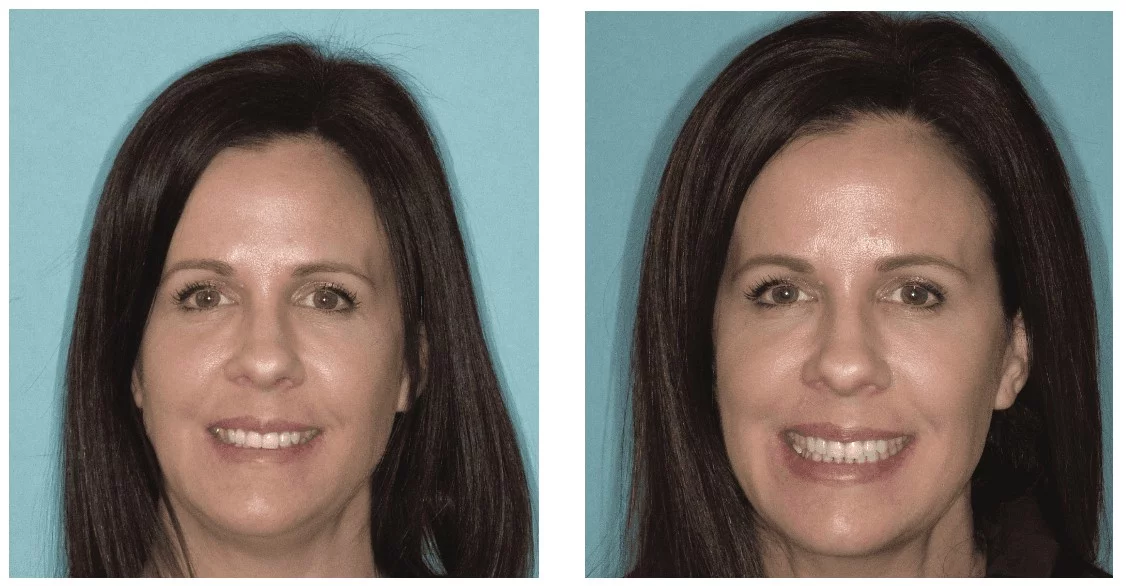
This patient returned to the office in April 2018 to revisit the options for aligning the lower front teeth and expanding the arches to widen the smile (Figure 2). At this point, however, a LR5 implant had been placed and restored. This limited the treatment objectives, making full correction of the Class II malocclusion on the right difficult if not impossible. Also, significant arch expansion would result in compromised alignment and occlusion of LR5 as the implant would be “left behind” as the rest of the arch expanded. Prior to implant placement, clear aligner therapy was considered the inferior option; however, with the implant in place, clear aligner therapy was now presented as the treatment of choice due to the ability to digitally plan tooth movement using the implant as a fixed anchor. With this in mind, treatment was started using SureSmile® aligners.
At the time of case submission, the SureSmile® aligner system provides the practitioner with two options: 1) “Do-It-Yourself” in which he/she does the digital setup, or 2) “Full Service” in which a SureSmile® technician does the setup for the practitioner to then modify and approve. This case certainly could have been done as a “Do-It-Yourself,” but due to the practitioner time that would have been involved in setting up the posterior expansion, it was decided to treat this as a “Full Service” case. The “Full Service” setup resulted in an initial sequence of 12 upper and 12 lower aligners. Attachments were planned on upper cuspids and upper right second bicuspid to aid in rotation, and on lower first bicuspids to provide anchorage for intrusion of lower anteriors. Despite significant lower crowding, interproximal reduction was not needed as adequate space was obtained through expansion.
With the SureSmile® aligner system, after approval of the setup, there are three different options for production of the aligners:
- Export the STL files for the staged models, print the models using an in-office 3D printer, and fabricate the aligners in-house.
- Order 3D printed models from Sure-Smile® and fabricate the aligners in-house.
- Order aligners fabricated by SureSmile®.


For this case, due to the in-house time that would have been involved in fabricating 26 aligners, it was decided to have the aligners fabricated by SureSmile®.
Attachments were bonded, and aligners were delivered with the instructions to wear 20-22 hours per day for 2 weeks per aligner. The patient was seen every 6-8 weeks to monitor progress. At the end of the initial series of 12 aligners, overall alignment was satisfactory; however, it was decided to rescan and order refinement aligners to idealize the alignment of lower incisors, intrude lower incisors to increase bite opening, and to improve smile esthetics with more posterior expansion. Attachments were left on during the refinement scan as it was decided that they would be beneficial for the additional treatment.
The refinement setup resulted in an additional seven aligners upper and lower. An additional attachment was added to aid with the rotation of the lower right cuspid. Because the movements planned in the refinement series were relatively subtle, refinement aligners were worn only 7 days per aligner. Total treatment time was 8 months. Upper and lower .035 Essix® Plus retainers were delivered with instructions to wear full time for 3 months and then night time indefinitely.
The final records show excellent alignment of upper and lower incisors (Figures 3-7). Significant posterior expansion was achieved with apparent improvement in smile esthetics. Class I occlusion was maintained on the left side. Due to the presence of the lower right second bicuspid implant, the end-on Class II occlusion on the right side was accepted as a compromise. With the upper and lower expansion, the implant was “left behind” and is out of occlusion. The implant crown can be redone in the future to re-establish occlusal contact.
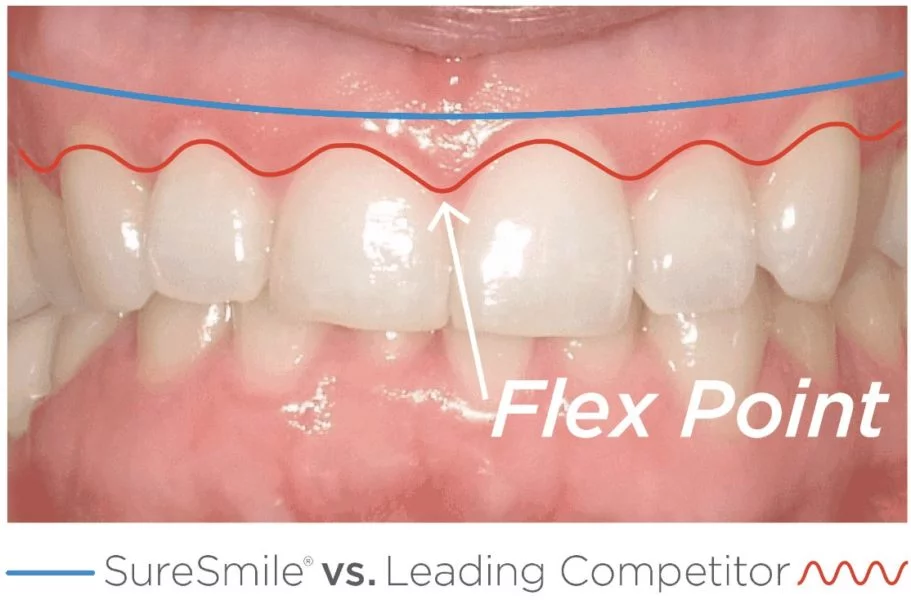
One potential advantage of SureSmile® aligners over a leading competitor in this case is the difference in aligner trim line (Figure 8). SureSmile® aligners have a “straight” trim line, while the competitor’s aligners are “scalloped” along the gingiva. The scalloped trim line results in multiple flex-points, one above each interproximal contact. In a case like this requiring posterior expansion, these flex-points, particularly the one at the midline, reduce aligner rigidity, potentially limiting the amount of expansion force that can be applied. The actual clinical significance of the difference in trim lines is still in need of scientific investigation.
Although not used in this case, if a case presents in which additional expansion force is required, printed models can be ordered, and aligners can be made in house using a thicker and/or more rigid plastic. Sure-Smile® aligners are made from .030 Essix® ACE, and this is generally the plastic used to make aligners in-office. However, if additional rigidity and greater expansion force is required, in-house aligners can be made with .035 Essix® Plus or even .040 Essix® Plus. This concept of using variable thickness aligners presents an exciting opportunity for advancement and customization of clear aligner therapy.
In this case, the SureSmile® aligner system was used to successfully treat a patient with crowding and narrow arches. The complicating presence of an implant was well managed and illustrates the advantage of using digital treatment planning and clear aligner therapy to address this issue. As technology continues to advance, it seems likely that clear aligner therapy will become the treatment of choice for a wide variety of orthodontic problems.
After reading this case study regarding crowded lower teeth and a narrow smile, check out this article on more complex malocclusions.
Stay Relevant With Orthodontic Practice US
Join our email list for CE courses and webinars, articles and mores

 Cory Costanzo, DDS, completed his Doctorate of Dental Surgery at the University of the Pacific School of Dentistry and continued there to receive his orthodontic certificate and Master of Science in dentistry. Dr. Costanzo is a Diplomate of the American Board of Orthodontics, a member of the American Association of Orthodontists, and the American Dental Association as well as state and dental societies. Dr. Costanzo maintains a private practice in Fresno, California.
