Dr. James Alexander discusses a way to avoid traditional PVS impression

A 24-year-old Hispanic female visited my office for a comprehensive examination, radiographs, and prophylaxis. The patient’s complaint was her lower third molars. Her periodontium was stable, with the only pocketing occurring around tooth Nos. 17 and 32.
[userloggedin]
There were multiple carious lesions, and tooth Nos. 17 and 32 were partially erupted, with tooth No. 17 mesially impacted. After her restorations and extractions were completed, the patient was placed on recall. At this time, the patient expressed interest in straightening her teeth. With her dentition and periodontium stable, the patient was deemed an excellent candidate for clear aligner therapy.
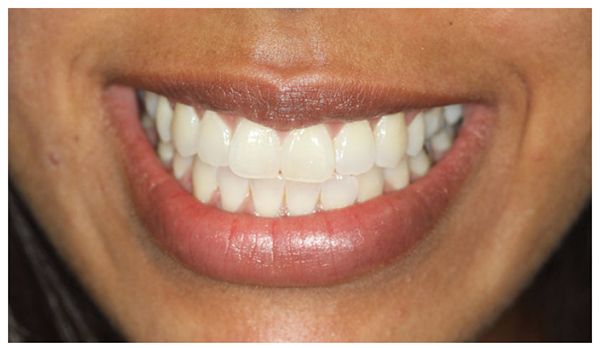
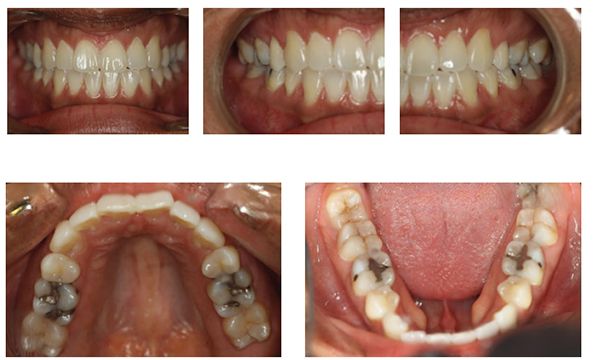
Upon post-orthodontic relapse, the patient was ½ cusp Class III bilaterally, with 5% overbite and 1 mm overjet. Tooth Nos. 7 and 26 and tooth Nos. 10 and 23 were in edge-to-edge occlusion. The patient lacked anterior guidance in protrusion, and she had a bilateral group function with a balancing side interference when in left excursive (Figures 1-6).

After obtaining consent for orthodontic treatment and discussing treatment options, we decided to move forward. Although I had previously submitted cases with standard PVS impression techniques, I had recently become aware that ClearCorrect was now accepting digital impressions through CEREC (Sirona). Full-arch scans and buccal bite were completed with the CEREC Omnicam and submitted to ClearCorrect, along with my prescription for treatment.
After receiving ClearCorrect’s proposed treatment plan, called a treatment setup, the first sets of trays arrived and were delivered to the patient. I then performed 0.3 mm interproximal reduction between tooth Nos. 25/26 and 26/27. The patient was given the second set of trays with instructions to switch to the new tray after 3 weeks. (Wear schedule preferences can be adjusted as the clinician sees fit.)
The patient returned for the second visit in 6 weeks and reported excellent compliance, which was verified by the accurate fit of the trays and closed space between tooth Nos. 26/27. The third set of trays called for engagers (also known as attachments), which were placed on tooth Nos. 8, 9, 10, 11, 23, 24, and 25. For easy placement, engager templates were provided by ClearCorrect. A thin layer of Vaseline® was placed inside both engager templates, followed by Filtek™ Supreme (3M) and TPH® flowable as the final layer. The patient was then isolated, the teeth were etched and bonded, and the templates were seated. I requested the patient return in 3 weeks, and at that time, I decided to replace the No. 25 engager that had previously chipped and verified that the fourth set of trays were seating normally. The patient returned after an additional 3 weeks, and we delivered sets five and six. I began noticing a discrepancy between the lower tray and the present engagers and decided to remove all lower engagers and replaced Nos. 23, 24, and 25 using the patient’s current aligner as the template. This resulted in a much more satisfactory fit. At the next 6-week visit, the case was tracking correctly, and the new set of trays was delivered. The patient returned in 3 weeks and reported pressure between Nos. 22/23. I performed IPR in this area with a lighting strip to allow easier movement. I then delivered the next trays, both of which had an excellent fit.
At the following 6-week check, tooth No. 23 was still resisting movement and not tracking appropriately. This time, stripping was performed on both the mesial and distal to ensure that the tooth had no resistance to movement. The patient was checked after 1 week, at which time I noted that the previously made space was closed, yet rotation was not complete. Additional interproximal stripping was performed, and the patient continued wearing the current aligner for an additional week. After the week, I saw the alignment of tooth No. 23 improving, and I decided to allow additional time in the current tray (Figure 7). When I saw the patient 3 weeks later, the alignment had improved further, but there were slight open contacts on both sides. Therefore, I decided to rescan with CEREC and submit for a revision to ClearCorrect.


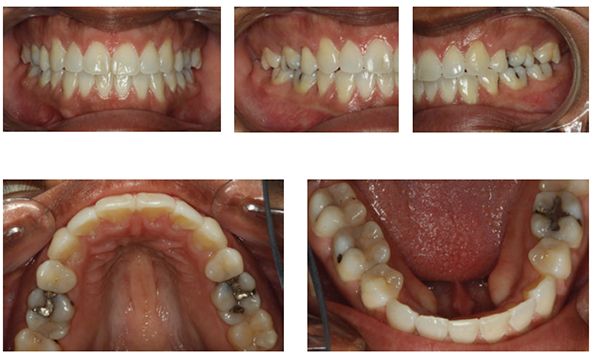
When the revision arrived, I placed an engager on tooth No. 23 and delivered the newly received trays along with another set to be changed after 3 weeks. At the 6-week check, the case was tracking correctly; therefore, the final three sets of trays were given to the patient. At the completion of these trays, tooth No. 23 had rotated into place with contacts on both sides closed. Mild occlusal adjustment was necessary on tooth No. 23, after which retainers were ordered from ClearCorrect (Figures 8-13). The patient was very happy with the final result and delighted she was able to receive orthodontic treatment without the need for traditional PVS impressions.
In summary, clear aligner therapy was successfully provided to a patient with post-orthodontic relapse with the aid of the CEREC system to provide intraoral scanning.
Treatment progression was various but not unusual for an adult patient. Close observation, judicious IPR, and treatment revision were key elements for an excellent result.
[/userloggedin]
[userloggedout][/userloggedout]
Stay Relevant With Orthodontic Practice US
Join our email list for CE courses and webinars, articles and mores

 James Alexander, DMD, grew up just a few miles from Saint Augustine, Florida. As a child, he enjoyed a range of activities, including soccer, baseball, football, tennis, BMX racing, and music. Although he graduated near the top of his class, he joined the United States Marine Corps at a time when most of his friends were making plans for college. The Marine Corps helped mold Dr. Alexander into the man he is today. After serving, he attended Jacksonville University, graduating summa cum laude with a 4.0 and a bachelor’s degree in biology. Following that, he earned his DMD from the University of Florida College of Dentistry. In the years since, he has continued to learn, amassing 343 hours of continuing education in his first year after dental school alone. He has trained in endodontics, attended the Nash Institute, and completed the prestigious Implant MaxiCourse® in New York City. He is also diligently working toward Diplomate status with the American Academy of Dental Sleep Medicine. Today, Dr. Alexander lives in the community he serves with his beautiful wife and three wonderful kids. Dr. Alexander is also currently a member of the American Dental Association, Florida Dental Association, Academy of General Dentistry, and the American Academy of Dental Sleep Medicine.
