Dr. Peter Gardell outlines the steps in a process for taking digital impressions for use with clear aligners
For years now, I’ve been using the CEREC Omnicam for intraoral scanning and ClearCorrect’s clear aligner system for orthodontics. Now that CEREC Ortho has arrived, I can use my Omnicam to take digital impressions for use with clear aligners and finally get rid of PVS material once and for all.
About CEREC Ortho
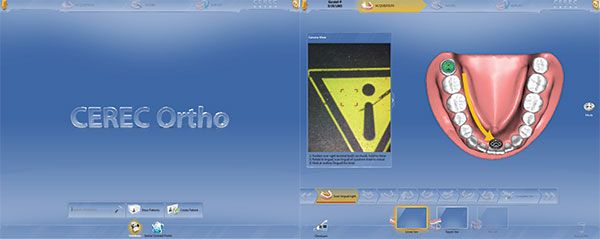
CEREC Ortho is a newly released software that has made capturing high-quality full-arch digital impressions much faster than was previously possible. It does this by using a well-defined imaging pattern, in which the software guides the clinician through step by step.
When doing full-arch scans, I have found two items that help with the scanning process:
- The Isolite® retraction system offers control of the patient’s soft tissue and control of saliva, which can interfere with the imaging process. Half of the arch can be scanned, and then the Isolite Mouthpiece can be repositioned and the rest of the dentition captured.
- The OptraGate® from Ivoclar Vivadent® is indispensable for efficient imaging. I love this product to be in place when taking the photographic records as well. It retracts the lips and keeps the buccal mucosa away back to the first molar. It does this comfortably for the patient, so leaving it in place during the visit is acceptable and speeds up the entire process.
Before you get started with the scanning process, special attention should be paid to ensure that all embrasures of the teeth are captured, and at least 2 mm of gingiva should be captured as well.
Full-arch scanning
When scanning, you will image the mouth in a set, specified manner. You will start by positioning the camera over the mandibular second right molar and holding it still for a few seconds. The camera will activate, and an audio signal will alert the operator that imaging has commenced. Roll the camera to the lingual surfaces, and be sure to move the camera anterior in a smooth and steady manner. Do not move the camera distal at this point. Once you are in the area of the lower left lateral and canine, again hold the camera steady for a few seconds. An audio tone will then signify that this sweep has been completed.
Return the camera to the occlusal of the right mandibular second molar, and again wait for the audio signal. Move the camera anterior, capturing the occlusal surfaces of the teeth. As you move forward over the lower incisors, the camera will beep indicating that you have completed your second sweep.
Next, bring the camera back to the occlusal of the second molar. Wait for the audio cue, and then rotate the camera to the buccal side. Move the camera forward until a beep is heard, signifying that the third sweep has been completed.
To complete the imaging, one more sweep is required to tie the buccal, lingual, and occlusal sweeps together. You should look for any unclear areas on the digital model, which can be filled in where needed. (These areas will be displayed in yellow.) Hold the camera over an area that has already been captured, and wait for the camera to activate. Now you can fill in any existing holes freehand. There is no set imaging protocol for this (if this step is needed at all).
You will then repeat this entire process for the upper jaw.
Buccal-bite scanning
The next step is the most exciting for seasoned CEREC users — capturing the dual buccal bite. Capturing the buccal bite has proven to be difficult for many doctors who were previously scanning in CEREC Connect. This is yet another reason why CEREC Ortho is superior for full-arch scanning. Similar to the scanning of the arches, the buccal scan is done in a well-defined process, which the software will guide the clinician through. It is very important to explain to the patients to bite firmly and to keep their teeth together as you image one side, followed by the opposing side.
When the buccal scan begins, there will be a start point displayed on the screen. Hold the camera steady on the mark (which is in the area of the first and second maxillary premolar), and wait for the audio signal. Move the camera down toward buccal surfaces of the mandibular teeth trying to overlay the camera placement with the target on the screen. Repeat the process on the contralateral side. Once both sides have been scanned, the models will auto-articulate (or “snap”) into position, which will conclude the imaging phase of the CEREC Ortho software. Videos of this process are available to view at www.Cerecdoctors.com.
Advantages
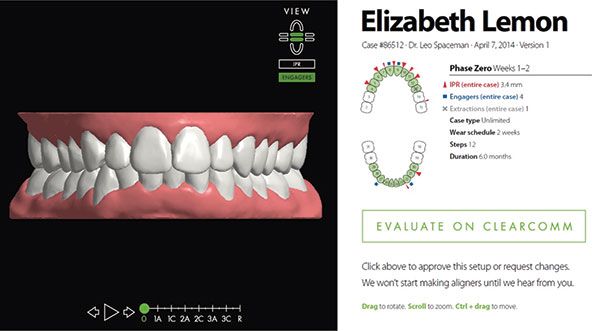
There is an immediate advantage of scanning with CEREC Ortho as compared to scanning with CEREC Connect — the first being dramatically decreased file sizes. There are also significant advancements with CEREC Ortho in the processing of virtual models: Unwanted and unnecessary soft tissue and artifacts will be automatically removed by the software. All of this adds up to a crisper and cleaner virtual model for the orthodontist to evaluate and for ClearCorrect to fabricate the aligners from.
Case submission
After the scan has been submitted, the orthodontist will need to access ClearCorrect doctor’s portal in order to submit the corresponding case to ClearCorrect (dr.clearcorrect.com). Basic patient information will be entered, and a checklist will be filled out on the desired treatment and movements. There is even a section where radiographs and photos can easily be uploaded. Once the case has been submitted, a case number will be assigned. This number will be used to identify this case from start to finish. ClearCorrect will then amass all the information submitted, including the scans, and in short order will send a confirmation of receipt.
And that’s it — all of the patient’s records have been submitted to ClearCorrect, without having to mail a single thing to the lab. No need to waste money on PVS materials and shipping fees, and even better — the clinician will receive the treatment setup from ClearCorrect in as quickly as 24 hours. When using traditional PVS impressions, the impressions would likely still be at the shipping carrier’s sort facility after 24 hours, likely not arriving to the lab for days! Patients are sure to be thrilled with the expedited treatment they’ll receive.
 Peter Gardell, DDS, graduated from New York University College of Dentistry with honors. He has received numerous awards for clinical excellence. Dr. Gardell has attained faculty and clinical mentor positions at some of the most prestigious educational institutions in the United States. He has written articles and lectured extensively on many of the technologies he has implemented in his office. Dr. Gardell is a member of the American Academy of Cosmetic Dentistry.
Disclosure: Dr. Gardell acknowledges having received no compensation from ClearCorrect.
Stay Relevant With Orthodontic Practice US
Join our email list for CE courses and webinars, articles and mores
