Drs. Pablo Echarri, Martín Pedernera, and Claus Schendell, Eng, outline the steps to accurate bracket setup without setup models
Introduction
The importance of the positioning of brackets has been demonstrated by many authors, in both labial and lingual orthodontics.
Drs. Echarri and Schendell have developed the Accurate Bracket Positioner™ (ABP) to achieve precision mounting If labial or lingual brackets, with a working time of approximately 30 minutes for an arch wire with labial brackets and 45 minutes for an arch wire with lingual brackets. The objectives proposed for the development of the ABP were that it should:
- be a precision instrument
- be easy to operate
- be usable with any type of labial or lingual bracket
- allow independent customization of each bracket parameter
- be capable of measuring each bracket parameter independently
- provide information that allows the same bracket position to be reproduced if it is necessary to repeat a transfer tray
- provide information that allows the creation of a transfer tray by precisely modifying any of the parameters with which the bracket was originally positioned
- provide information that allows the ideal arch wire template to be created
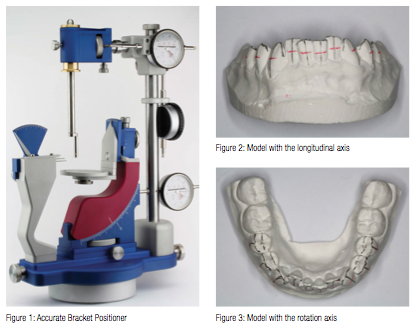 The ABP is based on using ABP positioners to three-dimensionally position the tooth from the initial patient model according to the prescription indicated by the specialist, and to position the bracket from the slot if using a “full size” ideal arch wire.
The ABP (Figure 1) consists of a rotating base, which allows easy manipulation and visualization of the bracket positioning from any angle, and three towers: the anterior tower, the model tower, and the posterior tower.
The model tower, in the center of the ABP, is used to position the model and allows the following movements:
- antero-posterior (sagittal) movement
- vertical movement
- rotation
- bucco-lingual inclination
- mesio-distal inclinatio
The anterior tower holds the torque and inclination indicator and the height styluses, as well as the torque scale. The height styluses allow tooth positioning in height, in-out, and rotation (first order), and the positioner allows positioning of mesio-distal inclination (second order) and torque (third order).
The posterior tower holds the bracket holder and allows in-out, height, and rotation movement of the brackets. The holder has two positions to allow labial or lingual positioning. The holder holds the Bracket Slot Holder, which holds the bracket to its slot. This accessory has three parts that can be adjusted to occupy the slot completely so that it always acts as a “full size” arch wire.
 Lingual bracket positioning procedure
The crown longitudinal axes, a horizontal line at the LA point (most prominent point of the crown [Figure 2]) and the rotation axes (incisal edges of the anterior teeth and labial cusps of the posterior teeth [Figure 3]) are drawn on the model. The model is painted with plaster separator and fixed on the model platform with silicone, in the closest possible position to the anterior tower.
Positioning of lingual brackets should start with the canine, since it is the tooth with the greatest labial-lingual thickness and will be the one that determines the in-out and height of all the brackets of the six anterior teeth.
The following steps should be followed to position a tooth:
The model is fixed on the platform with silicone (Figure 4).
The model is placed so that the upper pin of the torque and inclination positioner matches the LA point, and the lower pin matches the longitudinal axis (Figure 4). To achieve this model position, the antero-posterior position of the base, the platform height, the bucco-lingual inclination of the platform, and the mesio-distal inclination of the platform should be adjusted. In this position, the torque gauge and inclination gauge should measure the indicated prescription.
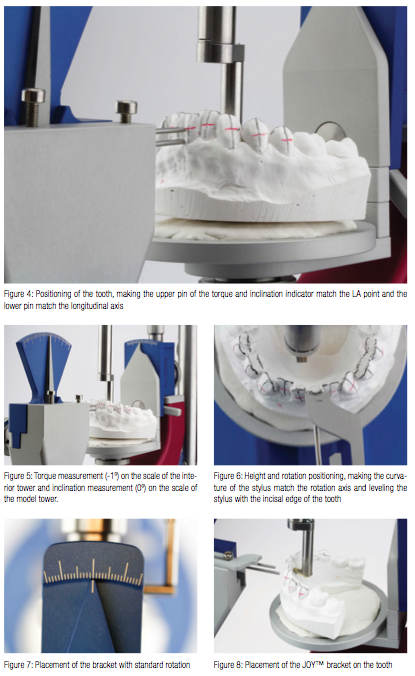 The incisal edge of the tooth is leveled with the stylus, for which the platform height screw is adjusted (Figure 5). In Figure 5, the torque is observed on the left-hand scale, which is -1º, and the mesio-distal inclination (right-hand scale), which is 0º.
The tooth in-out, height, and rotation are adjusted, leveling the stylus with the incisal edge of the tooth and making the curvature of the stylus match the rotation axis by adjusting the rotating platform (Figure 6).
The bracket will be placed at 0º rotation or with the overcorrection indicated if necessary (Figure 7). This scale is in the upper part of the bracket holder in the posterior tower. Figure 7 shows 0º overcorrection of the rotation, but can be corrected to mesio or distal rotation at an indicated angle.
The bracket is placed in the Bracket Slot Holder and can be fixed with an elastic (Figures 8 and 9).
The bracket is centered on the mesio-distal center of the tooth, adjusting the lateral movement of the model tower (Figure 10).
The smallest possible in-out is selected (determined by the thickest tooth, which is the canine). This bracket position is measured on the in-out gauge of the posterior tower (Figure 11) and is recorded so that it is possible to re-create an identical transfer tray if necessary.
The bracket is positioned at a height 1 mm from the gingival edge and 2 mm from the incisal edge. This bracket position is measured on the height gauge of the posterior tower (Figure 12) and is recorded so that it is possible to re-create an identical transfer tray if necessary.
A note is made of the bracket positioning in-out.
A note is made of the bracket positioning height.
A note is made of the height, in-out, and rotation position (first order) with which the tooth has been positioned.
A note is made of the mesio-distal inclination position (second order) with which the tooth has been positioned.
A note is made of the torque position (third order) with which the tooth has been positioned.
Light-cured composite is applied to the base of the bracket, and it is bonded to the tooth of the model tooth. After the removal of excess, it is light cured.

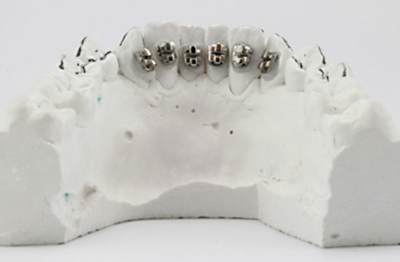
The same is done for the six anterior teeth (Figure 13). The brackets of the first premolars are then positioned and bonded (Figure 14). The premolars are positioned with the same bracket height but with a different in-out. This in-out difference is recorded on the in-out gauge of the posterior tower and will be compensated for in the arch wire. This in-out difference will be the disto-canine in-set measurement of the arch wire.
The brackets can be positioned with any prescription because each of the bracket parameters (in-out, height, rotation, mesio-distal inclination and torque) can be adjusted and measured independently. Thus, the ABP is an instrument that allows procedures to be completed using the very accurate bracket rebonding technique. For this procedure, the bracket is positioned on the model by modifying the indicated parameter. A new transfer tray is created that positions the bracket to achieve the final tooth position indicated by the case completion plan. 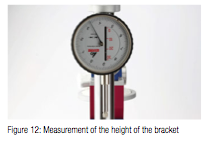
Summary
The Accurate Bracket Positioner (ABP) allows the positioning of labial or lingual brackets on the model for any prescription without creating setup models, saving working time. Each parameter can be customized and measured independently, making it possible to reproduce the position of the bracket to create an identical tray or a tray with a bracket position in which any of the parameters has been modified in a controlled manner.
This article was provided by Adenta.
References
1. Scholz RP, Swartz ML. Lingual orthodontics: A status report: Part 3. Indirect bonding – laboratory and clinical procedures. J Clin Orthod. 1982;16(2):812-820.
2. Echarri P. Técnica de posicionamiento de brackets linguales CLASS System. [CLASS System lingual brackets positioning technique]. Rev. Iberoamericana de Ortodoncia. 1997;16:1-17.
3. Echarri P. Ortodoncia Lingual. Técnica completa paso a paso. [Lingual Orthodontics. Complete step-by-step technique]. Barcelona (Spain): Nexus Ediciones S. L.;2003.
4. Echarri P, Schendell C. Kein Schleifen und Trimmen mehr. Kieferorthop Nachrichten. 2013;5:13-15.
5. Echarri P, Schendel C. Einfach und präzise. Kieferorthop Nachrichten. 2013;6:14-16.
6. Creekmore T. Lingual orthodontics — its renaissance. Am J Orthod Dentofacial Orthop. 1989;96(2):120-137.
7. Echarri P. Procedimiento para el posicionamiento de brackets en ortodoncia lingual II. [Procedure for bracket positioning in lingual orthodontics II]. Ortod Ling. 1998;1(3):107-117.
8. Echarri P. Lingual Orthodontics: An up-date of the bracket positioning and bonding procedures. J Orthod Society and Research of Thailand. 2003;3:1-14.
9. Echarri P. Lingual Orthodontics. Bracket set-up using Model Checker, Slot Machine, and CRC Ready Made Core Trays. Korean J Lingual Orthod. 2003; 2:58-71.
10. Echarri P, Pedernera M. Ortodoncia lingual simplificada. Técnica CLO3. [Simplified lingual orthodontics. CLO3 technique]. Tribuna Books Ripano Lingual Orthod J. 2014;(1):17-21.
11. Echarri P. Lingual technique indirect bonding: double transfer tray technique. World J Orthod. 2006; 7(2):154-158.
Stay Relevant With Orthodontic Practice US
Join our email list for CE courses and webinars, articles and mores

 Drs. Pablo Echarri, Martín Pedernera, and Claus Schendell, Eng, outline the steps to accurate bracket setup without setup models
